Removing A kitchen sink faucet can be an intimidating task, But with the proper tools and instructions, It doesn’t have to be. In this article, we will provide step-by-step directions on how to successfully remove a kitchen set mill. We’ll explain the necessary materials and preparation needed before the removal process begins. Additionally, We will offer safety tips to ensure that you complete the job safely And efficiently. How To Remove Kitchen Sink Faucet
Importance Of Removing A Kitchen Sink Faucet
It is responsible for providing clean water to wash your dishes, Prepare meals, And quench your thirst. However, Over time, it may start to malfunction Or become outdated. In such instances, Removing the kitchen sink faucet becomes A necessity.
Removing A kitchen set mill may seem like A daunting task at first glance but with the right tools and guidance, it can be done quickly and easily. When you remove an old Or worn-out mill, You not only improve the functionality of your kitchen but also enhance its aesthetic appeal. A new and modernized mill can add value to your home and make washing dishes more comfortable.
In addition to improving the appearance of your kitchen, removing an old faucet can also help prevent leaks that could lead to water damage in your cabinets Or floors.
Shut Off The Water Supply To The Sink
This is a necessary step to prevent water from spilling and damaging your kitchen floor. The process of shutting off the water supply is simple and easy, but it requires you to have some basic knowledge about plumbing.
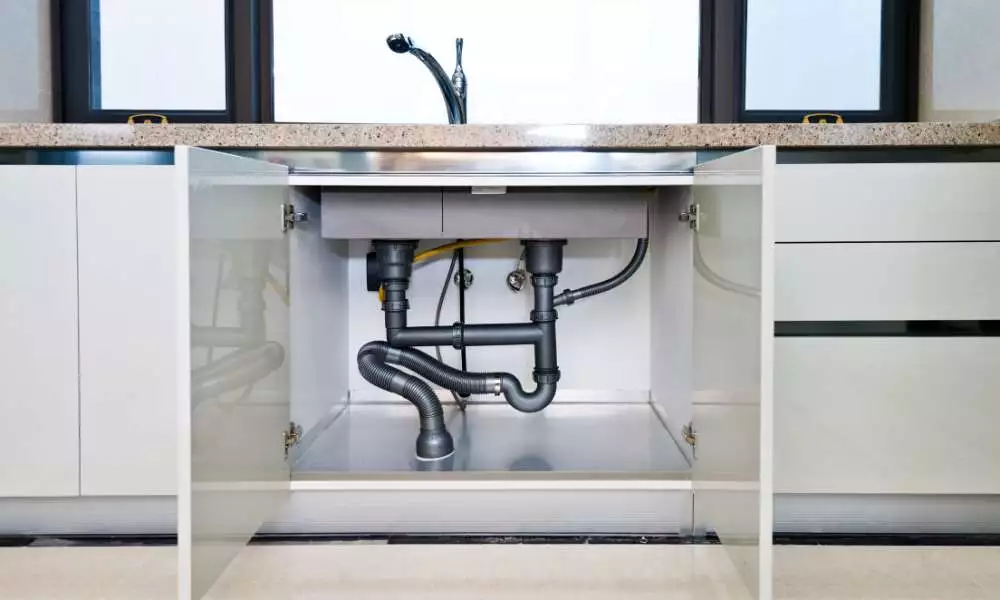
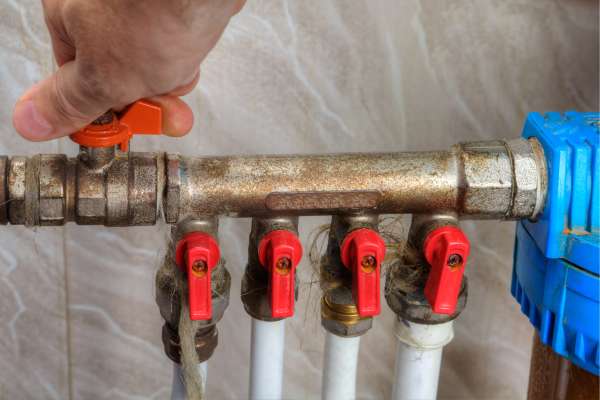
The first thing you need to do is locate the valve that controls the flow of water to your Install Moen kitchen sink. This valve is usually located under your sink, Near the pipes that connect your faucet to the plumbing system. Once you have located this valve, Turn it clockwise until it stops moving. This will shut off the flow of water to your set.
After shutting off the water supply, Turn on your mill and let any remaining water in the pipes drain out completely.
Place a Towel Or Container Under The Sink

Turn off the water supply valve under the sink before starting this process. Next, Use an adjustable wrench Or pliers to loosen and remove the nuts that hold the faucet in place. Be sure to keep track of all screws, Bolts, And other small components so that you can easily reassemble everything once you’ve finished.
Once you’ve successfully removed your kitchen set mill, inspect it for wear and tear Or any signs of damage. If necessary, Replace any worn-out parts with new ones to ensure optimal performance. By taking these steps and placing A towel Or container underneath your sink before beginning this process, you can avoid unnecessary messes and make this task much easier overall!
Identify The Type Of Faucet And Any Special Tools Needed
Different types of faucets require different methods for removal. Before beginning the process, It’s important to determine whether you have A ball, Cartridge, Compression Or ceramic disc mill.
Once you’ve identified the type of mill you have, gather any special tools that may be needed for removal. For example, Some mill may require a specialized wrench Or pliers to loosen certain parts. It’s always best to consult the manufacturer’s instructions or seek guidance from A professional if you’re unsure about which tools will be necessary.
Removing A kitchen sink faucet can seem like an intimidating task at first glance. However, By properly identifying your mill type and gathering any necessary tools beforehand, you can ensure that the process goes smoothly and without any unexpected hiccups along the way.
Disconnect The Water Supply Lines From The Faucet
Disconnecting the water supply lines from the faucet is one of the essential steps in removing your kitchen sink faucet without causing any damage to your plumbing system. Before you get started, make sure that you have all the necessary tools and materials to complete the job.
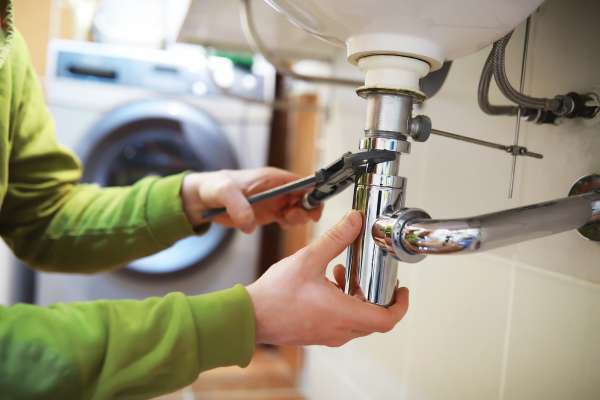
Firstly, Turn off the water supply valves located under your sink. This will prevent any water from flowing into your home’s plumbing system while you are working on disconnecting the water supply lines. Use An adjustable wrench Or pliers to loosen and remove both hot and cold water supply lines connected to your kitchen set mill. Keep A bucket Or towel handy as there may still be some residual water left in these pipes that could spill out during removal.
Use An Adjustable Wrench To Loosen The Nuts
This essential tool is designed to help loosen and tighten nuts that hold your faucet in place. But before you start using it, Make sure that the water supply is turned off and the drain is open.
To begin removing the faucet, locate the mounting nuts on both sides of the base plate. These nuts usually have hexagonal shapes that fit perfectly with an adjustable wrench. Slide the wrench over one nut and turn it counterclockwise until it loosens up. Repeat this step for each nut.
If there are still some stubborn nuts that refuse to budge, apply some penetrating oil Or rust dissolver onto them. This will help break down any corrosion Or debris buildup around the threads of the nuts. Keep turning your adjustable wrench until all of the mounting nuts have been removed completely from their respective bolts.
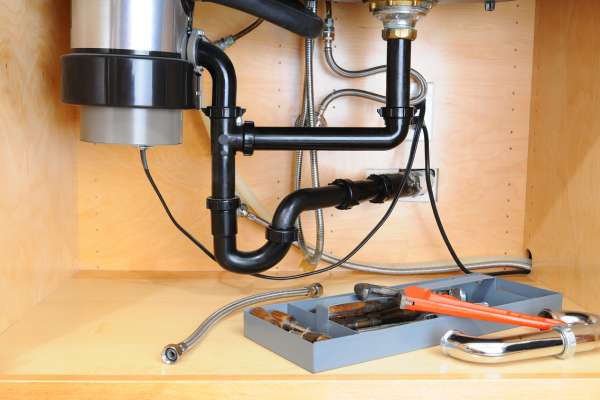
Remove Any Mounting Hardware Holding The Faucet

One of the most important steps is to remove any mounting hardware holding the faucet in place. This may include nuts, Bolts, Screws Or other types of fasteners that secure the mill to the countertop Or sink itself.
Before you begin removing any mounting hardware, make sure you turn off the water supply to your sink. You don’t want any water leaking out as you work on removing the mill. Once you’ve turned off the water supply, Use A wrench Or pliers to loosen and remove any nuts Or bolts that are securing the mounting hardware in place.
Depending on how your kitchen set mill is installed, There may be some additional steps required before you can completely remove it from your sink.
Gently Lift The Faucet Out Of The Sink

Removing A kitchen set faucet can seem like A daunting task, But with the right tools and some patience, It can be done with ease. The first step is to turn off the water supply under the sink. This prevents any accidental leaks Or flooding during the removal process.
Next, Use an adjustable wrench to loosen the nuts that hold the faucet in place. Be careful not to damage any other parts of your sink while doing this. Once you’ve loosened both nuts, Gently lift the mill out of its hole in the set.
If you encounter any resistance when lifting the mill out of its position, Check for any additional screws or bolts that may need to be removed before attempting again. Remember to take your time and work carefully so as not to damage anything else in your kitchen sink area.
Inspect The Sink And Faucet For Any Damage
These two elements get A lot of use, And over time they can be prone to damage Or wear and tear. As such, It’s essential that you take the time to regularly check them for any issues that may need addressing.
The first step in this process is removing your kitchen sink faucet. This will allow you better access to inspect the area around it for any signs of damage Or wear. You can do this by turning off the water supply valves under the sink and using an adjustable wrench to loosen the nuts holding the faucet in place.
Once you’ve removed your mill, Take A close look at both it and your set basin for any cracks Or chips. Even small imperfections can lead to bigger problems down the line if left unaddressed.
Clean The Mounting Area On The Sink

Over time, Dirt and grime can accumulate around the mounting area of the sink mill, Which can cause problems such as leaks and corrosion. To prevent these issues from arising, It’s important to regularly clean the mounting area on your sink.
The first step to removing your kitchen set faucet is to turn off the water supply valves located underneath the set. Once this has been done, you can begin removing any hardware that is holding the faucet in place. This may include screws Or nuts that are located on either side of the mill base.
Once you have removed all hardware from around the mounting area of your sink mill, You can use A cleaning solution to remove any dirt or grime that has accumulated over time. Avoid using abrasive cleaners Or tools that could scratch Or damage your set surface.
Check The Sink For Any Damage And Repair
Rinse vegetables and fruits, And even fill up pots with water for cooking. However, Over time, Sinks can suffer damage from regular wear and tear or accidental impacts. This can lead to leaks, Cracks, And other issues that need immediate attention.
One way to check for any damage in your kitchen sink is by examining it thoroughly. Start by removing the kitchen set faucet carefully. Check for any visible signs of wear such as scratches or chips on the surface of your set. If you notice these damages are affecting the functionality of your set Or causing leaks when using water, It’s time to consider repairing them.
In some cases, Repairing A damaged sink might be possible if it’s not too severe. However, If the damage is extensive Or irreparable, Replacing your entire set may be necessary.
Clean The Faucet
Mineral deposits and grime can build up around the faucet, Making it look dingy and unattractive. This buildup can also cause problems with water flow and make it difficult to turn the handle.
Fortunately, Removing your kitchen sink mill for cleaning is relatively simple. First, You’ll need to turn off the water supply valves located under the set. Next, Use A wrench Or pliers to loosen and remove the nuts that hold the mill in place. Once you’ve removed these nuts, Carefully lift the old faucet out of its mounting hole.
With your mill removed from its mount, Now’s A great time to take care of any repairs Or maintenance needs before reinstallation.
The Final Thought
Removing A kitchen sink faucet is A relatively simple task that can be completed in less than an hour. By following the steps outlined in this article, homeowners will be able to effectively remove their kitchen set mill and prepare for installation of A new one. With some basic knowledge of plumbing tools and supplies, This project can be easily accomplished with minimal cost Or effort.