
Replacing A kitchen faucet with A sprayer is one of the most common maintenance and repair activities for any homeowner. While it may seem like A daunting task, It doesn’t have to be. With the right tools and some basic knowledge, You can replace your kitchen faucet with A sprayer quickly and easily. In this article, We will walk you through all the steps necessary to replace your kitchen mill with a sprayer in no time at all.
Turn Off The Water Supply
This may seem like A no-brainer, But it’s a crucial step that should not be overlooked. Shutting off the water supply will prevent any unwanted leaks or spills while you work on your new faucet installation.
To locate your water shut-off valve, Look underneath your sink where your pipes connect to the wall. There should be two valves—One for hot and one for cold—that control the water flow into your sink. Turn both valves clockwise until they are completely closed. If you can’t find these valves Or if they don’t seem to be working properly, Turn off the main aqua supply valve in your home.
Once you’ve turned off the aqua supply, Open up your old mill and let any remaining water drain out.
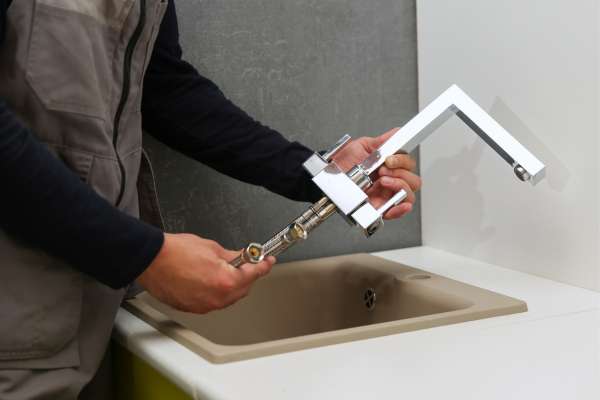
Disconnect The Water Supply Lines
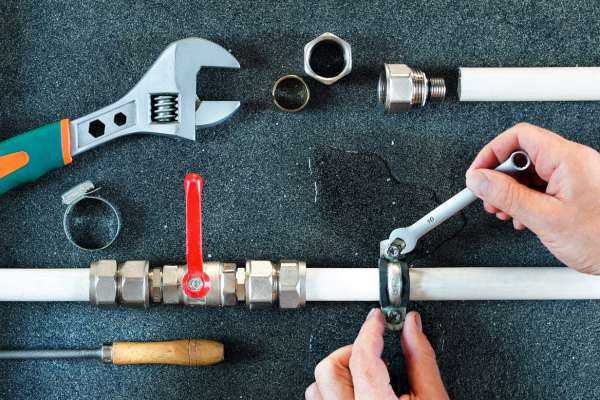
One of the important steps you need to take is disconnecting the water supply lines. But don’t worry, It’s not as difficult as it sounds! By following these simple steps, You can safely and easily disconnect your old faucet and get ready for your new one.
The first step is to turn off the aqua supply valves under the sink. These valves are usually located on either side of the pipes that connect to your faucet. Once they’re turned off, Turn on both hot and cold mill handles to relieve any remaining pressure in the lines. Then use an adjustable wrench Or pliers to loosen and remove the nuts that hold the supply lines in place. Be sure to have A bucket handy so any residual aqua in the lines can be collected.
Remove Mounting Nuts

One of the steps in the process involves removing the mounting nuts that hold the old faucet in place. This can seem like a daunting task, But it’s actually quite simple once you know what to do.
The first step is to turn off the water supply valves under your sink. This will prevent any aqua from flowing while you work. Next, Use A basin wrench Or adjustable wrench to loosen and remove the mounting nuts on each side of your old mill. Be sure to support your old faucet as you remove these nuts so it doesn’t fall and cause damage.
If your mounting nuts are rusted or stuck, Try applying some penetrating oil around them and letting it sit for A few minutes before attempting to loosen them again.
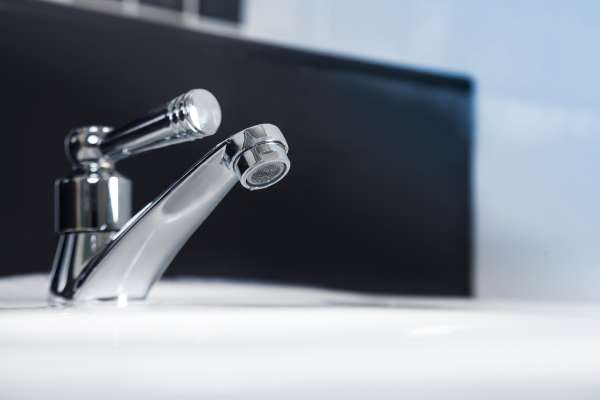
Lift the Old Faucet Out Of The Sink

Replacing your old kitchen faucet with A sprayer is an easy and affordable way to upgrade your kitchen. If you’re tired of the old, Leaky mill that’s been causing you problems for years, It’s time to lift it out of the sink and replace it with A brand new one.
First, Turn off the water supply valves under the sink. Then, disconnect the supply lines from your existing faucet. Use A basin wrench to loosen and remove any mounting nuts that are holding the mill in place. Once you’ve removed all parts of the old fixture, Clean up any debris Or build-up around where it was installed.
Now comes the fun part – Installing your new kitchen faucet with A sprayer! Follow the manufacturer’s instructions carefully to ensure proper installation. You’ll need to attach any necessary mounting hardware and supply lines before securing everything in place with mounting nuts underneath the sink.
Clean The Sink Area

One way to improve the functionality and appearance of your sink is to replace An old kitchen faucet with A new one that has A sprayer attachment. A kitchen mill with A sprayer can make it easier to clean dishes, Rinse produce, And fill pots with aqua.
Before replacing your kitchen faucet, Turn off the water supply under the sink And disconnect the old mill using adjustable pliers Or A basin wrench. Once you remove the old hardware, Clean any debris Or build-up from around the sink area before installing your new fixture. The process of installing A new mill can vary depending on its design. Some faucets come with their own mounting hardware while others require you to purchase additional pieces for installation.
Prepare The New Faucet

Replacing A kitchen faucet with A sprayer can be daunting for many homeowners, But it doesn’t have to be. With A little bit of preparation and the right tools, You can easily replace your old mill with a brand new one. Here are some steps you should follow to prepare for the installation:
1. ather all necessary tools: Before starting the process, Make sure you have all the required tools such as adjustable wrenches, Basin wrenches, Screwdrivers, Pliers etc.
2. Turn off water supply: It’s essential to turn off the main aqua supply before removing any plumbing fixture. Locate the aqua valves under your sink and turn them off by turning them clockwise.
3. Disconnect water lines: After shutting off the aqua supply, disconnect both hot and cold water lines from your existing faucet using an adjustable wrench.
Apply Plumber’s Putty To The Base Of The New Faucet

It’s something you can easily accomplish. One crucial step in this process is applying A plumber’s putty to the base of your new faucet before installing it. This simple task helps create A tight seal between the sink and mill, Preventing any water from seeping through and causing damage.
To begin, Make sure you have all the necessary tools on hand including A plumber’s putty, A wrench, And A screwdriver. Once you’ve removed your old faucet and thoroughly cleaned the area around where it was installed, Take small amount of plumber’s putty and roll it into a thin rope-like shape. Gently place this around the base of your new mill where it will come into contact with your sink surface.
Insert The New Faucet Into The Sinkholes

Replacing A kitchen faucet with A sprayer can be A daunting task for many homeowners. However, With the right tools and knowledge, Installing the new mill can be done in just A few simple steps. One of the most important steps is inserting the new mill into the sinkholes.
Before inserting the new faucet, It’s important to make sure that any old mounting hardware Or debris has been removed from the sink. Then, Carefully align the holes in the sink with those in the base plate of your new mill. Once aligned, Place A rubber gasket onto each hole so that it sits flush against your sink.
Next, Insert each of your water supply lines through their corresponding holes on your sink and secure them firmly by tightening with An adjustable wrench. Finally, Insert any additional components such As spray hoses Or soap dispensers into their designated holes and tighten accordingly.
Secure The Mounting Nuts

This is because A loose faucet can cause leaks and other problems, Which will affect your overall plumbing system. In addition, If the nuts are not tightened enough, It may lead to water damage on your countertop Or sink.
To secure the mounting nuts, You need to tighten them properly using A basin wrench Or adjustable pliers. First, Remove any debris from around the base of the faucet and then place rubber gaskets over the holes in your sink. Then insert threaded shanks into these holes And slide metal washers onto each shank. Hand-tighten mounting nuts onto threaded shanks while holding down the fixture so that it doesn’t move while tightening.
Connect The Water Supply Lines
While it may seem like A daunting task, Connecting the water supply lines can be done quickly and easily with just A few simple steps. Here are some tips to help you connect your aqua supply lines like a pro.
First, Make sure you turn off the old aqua supply valves under the sink. Next, Remove the old faucet by unscrewing all of its mounting hardware and disconnecting any hoses Or pipes connected to it. Once that’s done, Clean up any debris Or gunk left behind from removing the old fixture before installing your new mill in place.
Once your new mill is securely mounted, Connect its hot and cold water supply lines to their corresponding valves underneath the sink using flexible hose connectors. Be sure to hand-tighten everything first before using pliers for extra tightening power.
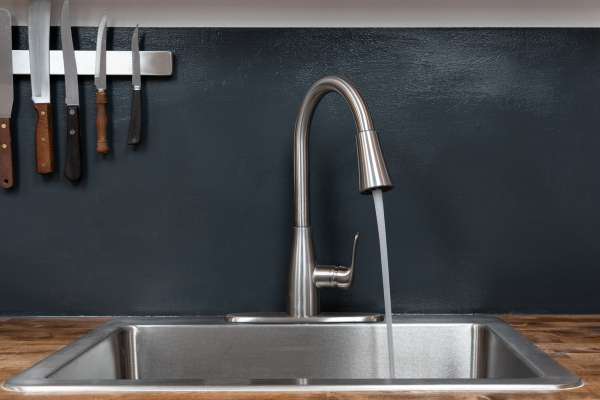
Install The Sprayer

Not only does it make washing dishes easier, But it also allows you to rinse off fruits and vegetables quickly. In this article, We will guide you through the process of installing A sprayer in place of your existing faucet.
The first step is to turn off the water supply under the sink. This will prevent any water from flowing while you are working on the installation. Next, Remove your old mill by loosening the nuts that hold it in place. A basin wrench can be helpful for this task as it allows you to reach tight spaces easily.
Once your old faucet is removed, Clean any debris Or buildup from around the sinkhole before installing the new sprayer. Follow manufacturer instructions carefully during installation, making sure all connections are secure and leak-free before turning on the aqua supply again.
Turning On The Water Supply
A well-planned and executed installation process will ensure that your new faucet functions smoothly for years to come. So, Before you start installing your new mill, It’s important to turn off the water supply.
To turn off the water supply, Locate the shut-off valve under your kitchen sink. In most cases, There are two valves: One for hot aqua and one for cold. Turn both valves clockwise until they stop to shut off the flow of aqua. If you don’t have individual shut-off valves under your sink, You’ll need to shut off the main valve that controls all of your home’s water supply.
Once you’ve turned off the aqua supply, You can proceed with removing your old kitchen faucet and installing your new one.
Checking For Leaks
A leaky faucet can result in significant water wastage, And it’s also one of the most common causes of high aqua bills. It is therefore important to ensure that your kitchen faucet is in good condition before installing A new one.
To check for leaks, Start by turning off the water supply valves located under the sink. Next, Turn on the mill and allow any remaining aqua to drain out. Observe the area around the base of the mill and underneath the sink for signs of dripping Or moisture. Check all connections for any cracks Or damage that might cause a leak.
If you detect any leaks during your inspection, It might be best to replace your current kitchen faucet entirely rather than trying to repair it.
Testing The Sprayer

That’s where testing the sprayer comes in. By taking A few minutes to test out your new sprayer, You can ensure that it functions correctly and is ready for use.
First, Turn on the water and check for any leaks around the base of the mill. If there are no leaks, Move on to testing the sprayer itself. Pull down on the spray head and release it several times to make sure it snaps back into place easily. Then, Activate the sprayer and check that aqua flows smoothly without any sputtering Or interruption.
Next, Test out any additional features your sprayer may have such as different spray patterns Or adjustable water pressure. Make sure each feature works As expected before moving forward with installation.
The Final Thought
Replacing A kitchen faucet with A sprayer is A relatively easy task that can be completed without the help of A professional. Learning how to do it yourself will save you time and money, While also giving you the satisfaction of having completed the job yourself. Make sure to follow all safety precautions when working with any type of plumbing, And always turn off the water supply before beginning work. Once complete, You can enjoy your new sprayer and all of its convenient features.