Installing new kitchen cabinet handles is A great way to give your kitchen An updated look without A major renovation. Whether you’re replacing existing hardware Or adding it for the first time. Knowing how to install kitchen container handles will help you get the job done right. This article will provide step-by-step instructions on how to install kitchen cabinet handles, So you can be sure that your cabinets are looking their best.
Importance Of Installing Kitchen Cabinet Handles
First, Remove the existing handles by unscrewing them from the back of the cabinet door Or drawer front. Then, Measure and mark where you want your new handle placement to be using A ruler Or measuring tape. Use a drill bit that matches the size of your screws to create pilot holes for each handle. Finally, Attach your new handles using screws and A screwdriver.
Not only install kitchen handles make it easier to access stored items in cabinet, but They also serve as an opportunity for customization in kitchen design.
Gather Materials
There are many different styles available, Including knobs, Pulls, And cup handles. Consider the size and shape of your cabinets when selecting A handle style.
Next, You’ll need to measure the distance between each cabinet door Or drawer where you plan to install A handle. Be sure to write down these measurements so you can purchase the correct length screws for installation. You’ll also need A drill with the appropriate drill bit size for your chosen screws.
When purchasing handles and screws, Make sure to buy extras in case of mistakes Or misalignments during installation. Other essential tools include A level to ensure straight installation and A screwdriver Or power drill with screwdriver attachment.
Types Of Handles To Choose From
One popular option is the traditional knob handle. This type of handle is often round Or cylindrical in shape and can be made from materials such as metal, plastic, Or glass. Knobs are easy to grip and can add A classic touch to any cabinet design. They also come in various sizes, Making them suitable for cabinets of all shapes and sizes.
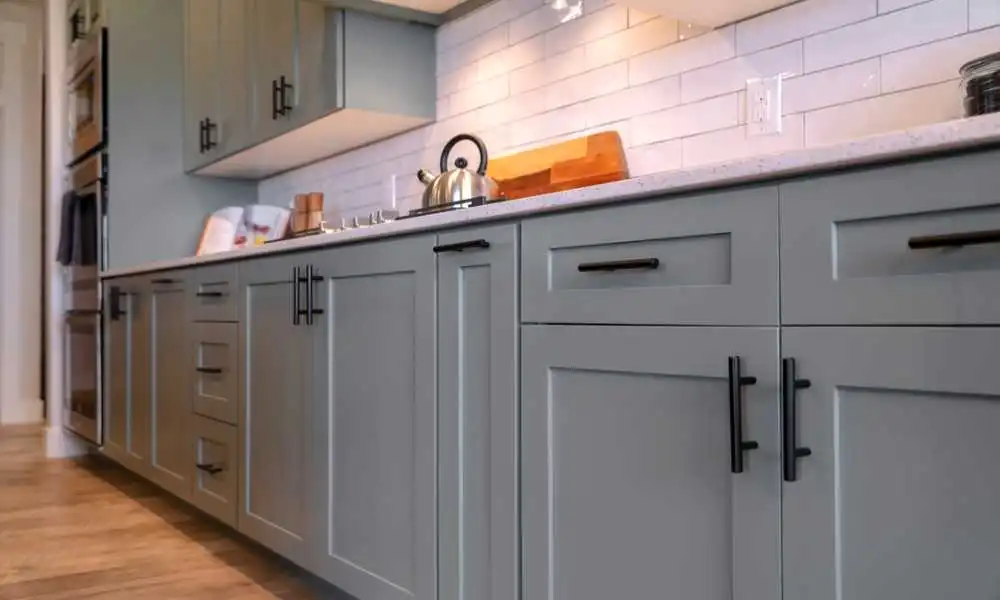
If you’re looking for something more modern, Consider choosing A bar handle. These handles are long and narrow with A sleek appearance that complements contemporary kitchen designs well. Bar handles come in different lengths, So you can choose one that suits your specific needs perfectly.
Tools Required For Installation
Install kitchen cabinet handles is a simple and cost-effective way to give your kitchen an instant facelift. However, Before you begin the installation process, It’s important to have the necessary tools on hand. Here are some essential tools required for installing kitchen- cabinet handles.
Firstly, You will need a drill with A drill bit that is slightly smaller than the screws that come with your handles. This will help you make pilot holes in your cabinets without damaging them. Additionally, A screwdriver Or power screwdriver will be needed to tighten your screws into place.
Secondly, The Measuring tape is crucial when installing cabinet handles as it helps ensure that they are aligned properly. A level can also come in handy to ensure that all of your hardware is straight and even.
Measure And Mark Placement
It’s important to measure and mark the correct placement for each handle before drilling any holes. This will ensure that your handles are level and symmetrical, Giving your cabinets a polished and professional appearance.
To get started, Gather all of your tools including a measuring tape, Pencil, Drill, Drill bit, And screws. Begin by determining the center point of each cabinet door Or drawer front where you want to install a handle. Measure from the top edge of the door Or drawer down to this center point and make a small mark with your pencil. Repeat this process on all doors Or drawers.
Next, Determine how far apart you want your handles to be on each door Or drawer.
Measure The Distance Between The Handle Screw Holes
However, Before you rush out to buy new handles, It’s important to measure the distance between the handle screw holes on your existing cabinets. This will help ensure that you purchase handles that fit properly and save you from having to drill additional holes.
To measure the distance between handle screw holes, First, Remove any existing handles from your kitchen cabinets. Then, Use A measuring tape Or ruler to measure the distance between the center of one hole to the center of the other hole. Make sure to take accurate measurements for each cabinet as they may not all be exactly the same.
Once you have measured all of your cabinets, Take note of these measurements and bring them with you when purchasing new handles. You can also use these measurements as A guide when drilling new holes for your handles if necessary.
Mark The Placement Of The Handles On The Cabinets
One of the most important aspects of installing handles on your cabinets is marking their placement accurately. This step will ensure that your handles are level and aligned with one another, Giving your kitchen A polished look.
To start, Measure the distance from the top edge of your cabinet door to where you want the handle to be placed. Use A pencil Or masking tape to mark this spot on each cabinet door where you plan on installing a handle. It’s crucial that you use a level at this stage to make sure all marks are straight and even.
Next, Measure the distance between each handle mark on adjacent doors for consistency in placement.
Use Template For Precise Placement
A small error in placement can throw off the entire look of your cabinets and ruin the intended aesthetic. Fortunately, Using A template can help ensure that your handles are placed exactly where you want them.
To start, Gather the necessary materials: A handle template (which you can either purchase Or make yourself), A measuring tape, A pencil, And drilling tools. First, Determine where on the cabinet door Or drawer face you want to place the handle. Using your measuring tape and pencil, Mark two spots that will serve as your guide for where to place your template.
Next, Position your handle template over these marks and secure it in place with masking tape. The template should have pre-drilled holes that correspond with standard handle sizes; Use these as guides for drilling into your cabinet door Or drawer face.
Use A Drill To Make Holes For The Screws
To start, Measure and mark where you want your handle to go on each cabinet door Or drawer front. Then, Choose the appropriate-sized drill bit for your screw and clamp the wood securely in place so it doesn’t shift while you’re drilling. It’s always best to start with A smaller drill bit and work your way up to avoid splitting Or cracking the wood.
Once you’ve made your hole, Remove any excess sawdust Or debris from around it before attaching your handle with screws. A properly installed kitchen cabinet handle not only adds functionality but also enhances the overall look of your cabinets.
Use The Correct Size Drill Bit ForThe Screw Size
To determine the correct size drill bit, Sart by measuring the diameter of the screw. You can do this using A caliper by comparing it to A drill bit set. Once you have determined the diameter of the screw, Choose A drill bit that is slightly smaller in diameter.
Using a drill bit that is too large can cause damage to your cabinets and weaken their structural integrity. Additionally, If you use a drill bit that is too small, You may not be able to fully secure the screws into place. By taking the time to choose and use the correct size drill bit, You can ensure A successful install your new kitchen cabinet handles.
Be Careful Not To Drill Too Deeply Or At An Angle
One of the most common mistakes people make is drilling too deeply Or at an angle. This can cause irreparable damage to your cabinets, Making them unusable and requiring expensive repairs.
To avoid this mistake, Start by measuring where you want your handle to be placed on the cabinet door. Make sure that it’s centered and level with other handles in your kitchen. Once you have marked the spot, Use masking tape to create a guide for drilling. This will ensure that the drill bit stays in place and doesn’t slip around while you’re working.
When drilling, Make sure to go slowly and apply even pressure to the drill. If you feel resistance Or hear strange sounds, Stop immediately and check your work.
Insert The Screws Into The Holes
You’ll need to measure and mark where your handles will go on each cabinet door Or drawer front. Once you’ve done this, Use A drill bit that’s slightly smaller than the diameter of your screws to make pilot holes in these locations. This will help prevent splitting Or cracking when you insert the screws later on.
Next, Take one of your handle screws and thread it through one of the mounting holes on your handle. Insert this screw into one of your pilot holes and tighten it by hand until snug.
Align The Handle With The Screw Holes
When aligning the handle with the screw holes, some people overlook this important step. Ensuring proper alignment will not only enhance the aesthetic of your cabinets but also improve functionality.
To begin with, Measure and mark where you want to place each handle on your cabinet doors or drawers. It’s essential to take accurate measurements so that all handles are consistent in placement throughout your kitchen. Next, Use A drilling template Or create one by marking dots on a piece of paper according to your measurements.
Once you have marked out where you want each handle to go and created a drilling template, It’s time to start drilling holes for the screws.
Tighten The Screws Until The Handle Is Secure
It’s important to ensure that the handles are installed correctly and securely so they don’t become loose Or fall off over time. Follow these steps to properly install your new kitchen cabinet handles.
First, Measure the distance between the screw holes on your existing handle Or the placement of the holes on your new handle. Use these measurements to mark where you will drill holes for the screws on each cabinet door or drawer front. Be sure to use A level when marking so that all of your handles will be straight and even.
Next, Drill pilot holes for the screws using a bit slightly smaller than the size of your screws. This will help prevent splitting in the wood as you screw in the handles. Then, Insert the screws through each hole and tighten them until they are secure.
Install Handles On All Cabinets And Drawers
Not only will it enhance the overall appearance of your kitchen, But it will also improve functionality by making it easier to open and close doors and drawers. In this article, We’ll show you how to install kitchen cabinet- handles in just a few easy steps.
Before you begin, make sure you have all the necessary tools and materials. You’ll need A drill with the appropriate bit size for your screws, A tape measure Or ruler, A pencil for marking where to drill the holes, And of course, The handles themselves. Start by measuring the distance between the two screw holes on each handle. It will ensure that they are evenly distributed throughout each cabinet or drawer.
Next, Use your pencil to mark where you want each handle to go.
Check For Consistency In Placement And Alignment
Installing kitchen cabinet handles is a task that requires care and attention to detail. One of the most important aspects of the installation process is ensuring consistency in placement and alignment. This means making sure that all handles are positioned at the same height. And that they are perfectly aligned with each other.
To achieve this level of consistency, It’s important to measure carefully before drilling any holes. Use a tape measure Or ruler to mark out the exact position where each handle will be installed. Double-check your measurements before proceeding to avoid any mistakes that could throw off your alignment.
Once you have marked out your positions, Use A template Or guide to ensure consistent hole spacing between handles. This will help you maintain A uniform appearance for your cabinets, and make them look more professional overall.
The Final Thought
Installing kitchen cabinet handles is A great way to upgrade the look of your kitchen. With the right tools and steps to follow, You can have your cabinets looking brand-new in no time. Remember to take your time and measure twice just in case, As well as to make sure the holes are lined up correctly. Furthermore, Make sure you have all the hardware available before you start so that you don’t get stuck during the process.