
A clean kitchen tile floor is more than just a matter of aesthetics—it’s essential for maintaining hygiene, preventing stains, and ensuring longevity. Over time, dirt, grime, and spills accumulate, dulling the tiles and embedding into grout lines. Without proper maintenance, bacteria and mold can thrive, creating an unhealthy environment. Whether you’re dealing with everyday messes or stubborn stains, understanding the best techniques for cleaning your kitchen tile floor will keep it looking pristine. This guide provides a detailed, step-by-step approach to achieving a spotless kitchen floor using effective cleaning methods and the right supplies.
Understanding Your Kitchen Tile Floor
Not all kitchen tiles are created equal. Different materials require unique care to maintain their luster and durability.
- Ceramic and Porcelain Tiles – These are the most common kitchen flooring options due to their resilience and easy maintenance. However, they can become slippery when wet, requiring careful cleaning techniques.
- Natural Stone Tiles (Marble, Granite, Travertine) – While stunning, these materials are porous and susceptible to staining. Harsh chemicals like vinegar and bleach can degrade their surface, so pH-neutral cleaners are best.
- Vinyl and Linoleum Tiles – Although they mimic the appearance of real tile, they have unique care needs. Too much water can cause warping, making damp mopping the safest cleaning method.
Understanding the type of tile in your kitchen ensures that you use the appropriate cleaning solutions and tools, preserving the integrity of your floor.
Essential Cleaning Supplies for Kitchen Tile Floors
The right cleaning tools and products make all the difference in maintaining a sparkling kitchen tile floor. Here’s what you need:
Cleaning Tools:

- Microfiber Mop or Steam Mop – Efficient at trapping dirt without scratching the surface.
- Soft-Bristle Brush or Toothbrush – Ideal for scrubbing grout lines and removing embedded debris.
- Vacuum Cleaner with a Hard Floor Setting – Helps remove dust and pet hair before mopping.
- Bucket and Spray Bottle – Necessary for mixing and applying homemade or commercial cleaning solutions.
Cleaning Solutions:
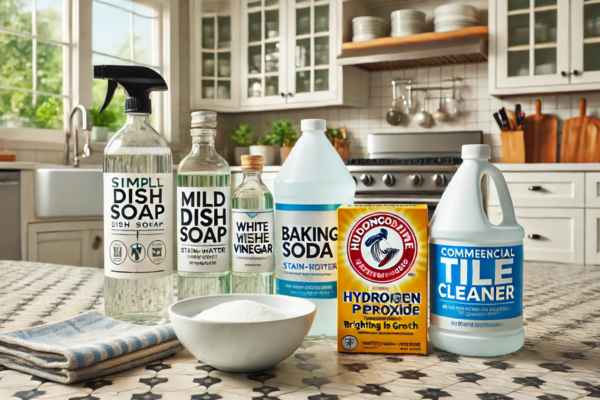
- Mild Dish Soap and Warm Water – A simple, safe, and effective everyday cleaner.
- White Vinegar and Baking Soda – Excellent for removing stains (avoid on natural stone).
- Hydrogen Peroxide – A great alternative to bleach for brightening grout and eliminating bacteria.
- Commercial Tile Cleaner – If opting for store-bought solutions, ensure they are safe for your specific tile type.
With these essentials in hand, you’re equipped to tackle both daily maintenance and deep-cleaning tasks.
Step-by-Step Guide: How to Clean Kitchen Tile Floor
A proper cleaning routine ensures that kitchen tiles remain free of dirt, stains, and bacteria. Following these steps will guarantee the best results.
Pre-Cleaning: Sweeping and Dust Removal

Before introducing water or cleaning solutions, it’s crucial to remove loose dirt, crumbs, and dust.
- Start with a Dry Sweep: Use a soft broom or microfiber dust mop to capture surface debris.
- Vacuum the Floor: If your vacuum has a hard floor setting, use it to remove fine dust and pet hair.
- Pay Attention to Corners and Edges: Dirt tends to accumulate in these areas, so don’t skip them.
This step prevents dirt from turning into muddy streaks when mopping, ensuring a more thorough clean.
Deep Cleaning: The Best Mopping Techniques

Once the floor is free of debris, it’s time for a deep clean. The method depends on your tile type.
For Ceramic and Porcelain Tiles:
- Mix warm water with a small amount of mild dish soap or a few drops of vinegar.
- Use a microfiber mop for even application.
- Mop in an “S” pattern to avoid spreading dirt back onto clean areas.
- Rinse with fresh water to remove any residue.
For Natural Stone Tiles:
- Avoid acidic cleaners like vinegar. Instead, use a pH-neutral stone cleaner.
- Mop gently to prevent damage to the sealant.
- Dry with a soft towel to prevent water spots.
For Vinyl and Linoleum Tiles:
- Use a damp (not soaking) mop with a gentle cleaning solution.
- Avoid steam mops, as excessive moisture can cause warping.
Regardless of the tile type, always dry the floor afterward to prevent streaks and water spots.
Removing Tough Stains Without Damaging Your Tile

Even with regular cleaning, stains from spills, grease, and foot traffic can build up over time. Here’s how to treat them:
- Grease Stains: Mix dish soap with warm water and gently scrub using a microfiber cloth.
- Wine, Coffee, and Juice Stains: Use a baking soda paste (baking soda + water), let it sit for 5-10 minutes, then scrub gently.
- Scuff Marks: A magic eraser works wonders on stubborn marks.
- Grout Discoloration: Apply hydrogen peroxide or a baking soda paste and use a toothbrush to scrub the grout lines.
For persistent stains, a professional-grade tile cleaner may be necessary. Always test a small area before applying any new cleaner to the entire floor.
DIY Tile Floor Cleaning Solutions
Store-bought cleaners are effective, but they often contain harsh chemicals that can erode tile surfaces over time. Fortunately, homemade cleaning solutions can be just as powerful—if not more so—while being safer for your home and the environment.
- Vinegar and Water Solution: Perfect for ceramic and porcelain tiles, a simple mix of equal parts white vinegar and warm water cuts through grease and eliminates bacteria. However, avoid using vinegar on natural stone tiles, as its acidity can cause damage.
- Baking Soda Paste: Stubborn stains? Make a paste using baking soda and water, apply it to the stain, and let it sit for 10–15 minutes before scrubbing gently with a soft brush.
- Lemon and Salt Scrub: For a fresh scent and a natural disinfectant, combine lemon juice with salt and use it as a scrub for tough grime spots.
- Hydrogen Peroxide for Grout: If your grout looks dingy, apply hydrogen peroxide directly and let it sit before scrubbing with a toothbrush.
These DIY solutions offer a natural, cost-effective way to maintain a clean tile floor without the risk of harmful fumes or residue.
How to Keep Tile Grout Clean and Stain-Free
Grout, the porous material between tiles, is a magnet for dirt, grease, and bacteria. Left unchecked, it can become discolored and even moldy. Keeping grout clean not only enhances the appearance of your floor but also prevents long-term damage.
- Regular Maintenance: Wipe down grout lines weekly with a damp microfiber cloth and mild detergent to prevent buildup.
- Deep Cleaning with Baking Soda and Hydrogen Peroxide: Apply a paste of baking soda and hydrogen peroxide to stained grout, let it sit for 15 minutes, then scrub with a small brush before rinsing.
- Sealing the Grout: After a thorough cleaning, apply a grout sealer to prevent future stains and moisture penetration.
- Avoid Harsh Scrubbing: Using abrasive tools can wear down grout over time, making it more susceptible to dirt accumulation.
By incorporating these grout-cleaning practices into your routine, you can keep your kitchen floor looking pristine and prevent unnecessary repairs.
How to Tackle Grease and Sticky Residue on Tile Floors
Kitchen floors are particularly vulnerable to grease buildup, thanks to cooking splatters and food spills. Over time, this grease can form a stubborn, sticky residue that dulls your tiles and attracts more dirt.
- Dish Soap and Warm Water: The simplest yet most effective method for cutting through grease is using a few drops of dish soap in warm water. Apply with a mop, then rinse thoroughly.
- White Vinegar Solution: For more persistent grease, mix equal parts white vinegar and water. Mop the floor with the solution, then wipe with a dry cloth to remove any lingering residue.
- Cornstarch Absorption Method: If grease spills are fresh, sprinkle cornstarch over the area and let it sit for 10 minutes to absorb the oil before sweeping it away.
- Steam Mops for a Deep Clean: A steam mop can break down layers of grease without the need for chemicals, making it an excellent choice for deep cleaning sessions.
Tackling grease promptly prevents it from becoming a long-term problem and keeps your kitchen feeling fresh and clean.
The Best Mop for Kitchen Tile Floors: Choosing Wisely
Not all mops are created equal, and using the wrong one can leave streaks, spread dirt, or even damage your tile. Selecting the right mop ensures effective cleaning while making the process easier.
- Microfiber Mop: Highly absorbent and gentle on tiles, microfiber mops pick up fine dust and dirt without leaving streaks. They are ideal for both dry and wet mopping.
- Spin Mop: A spin mop with a built-in wringer offers control over how wet your mop is, preventing excessive moisture from seeping into grout lines.
- Steam Mop: If you want a deep clean without harsh chemicals, a steam mop can sanitize and break down grime effortlessly. However, be cautious when using it on natural stone tiles, as excessive heat can weaken the sealant.
- Traditional String Mop: While effective for large spills, string mops tend to hold excess water, which can lead to longer drying times and streaking.
Choosing the best mop for your kitchen floor ensures efficiency and longevity, making cleaning less of a chore.
How to Remove Hard Water Stains from Kitchen Tile
Hard water stains can leave unsightly white, chalky deposits on your tiles, especially around sinks and dishwashers. These mineral deposits not only dull the surface but also make cleaning more challenging.
- Vinegar and Lemon Juice Solution: The acidity in white vinegar and lemon juice helps dissolve mineral buildup. Apply with a cloth and let it sit for a few minutes before scrubbing.
- Baking Soda Scrub: Make a paste with baking soda and water, apply it to affected areas, and scrub gently with a sponge to lift stubborn stains.
- Commercial Hard Water Removers: If natural solutions don’t work, opt for a specialized hard water stain remover designed for tile surfaces.
- Preventing Future Buildup: Regularly drying floors after mopping and using a water softener can reduce the recurrence of hard water stains.
By addressing hard water stains as soon as they appear, you can maintain the natural shine of your kitchen tiles without the frustration of stubborn residue.
Preventing Mold and Mildew on Kitchen Tile Floors
Mold and mildew thrive in damp environments, and kitchen floors—especially near sinks and dishwashers—are prime targets. If left unchecked, mold can cause not only unsightly stains but also unpleasant odors and health concerns.
- Keep Floors Dry: The simplest way to prevent mold is to keep your tile floor dry. After mopping, ensure proper air circulation by opening windows or using a fan. Wipe up spills immediately, especially in areas where water tends to pool.
- Use a Vinegar Solution: Vinegar is a natural antifungal agent. A mixture of equal parts white vinegar and water can be sprayed onto problem areas weekly to keep mold at bay. However, avoid using vinegar on natural stone tiles, as the acidity can cause etching.
- Regular Grout Maintenance: Since grout is porous, it absorbs moisture quickly, making it a hotspot for mold. Cleaning grout lines with a baking soda paste and sealing them annually can significantly reduce mold growth.
- Increase Ventilation: If your kitchen lacks airflow, mold is more likely to thrive. Consider using a dehumidifier in humid climates or running exhaust fans after cooking to keep moisture levels low.
Mold prevention is an ongoing effort, but with regular maintenance, you can keep your tile floors fresh and free from harmful buildup.
How to Make Your Kitchen Tile Floor Shine
Over time, kitchen tiles lose their original luster due to daily wear, accumulated grime, and improper cleaning techniques. If your floor looks dull despite regular cleaning, it’s time to take a few extra steps to restore its shine.
- Use a Gentle Cleaning Solution: Harsh chemicals can strip tiles of their protective coating, leading to a faded appearance. Instead, mix warm water with a few drops of mild dish soap or a pH-neutral tile cleaner for safe yet effective cleaning.
- Polish with a Microfiber Cloth: After mopping, go over the floor with a dry microfiber cloth or mop to buff away streaks and enhance the shine.
- Try a Vinegar and Water Rinse: For ceramic and porcelain tiles, a diluted vinegar solution (one part vinegar to three parts water) can help remove dulling residues. Avoid using this method on natural stone, as it can cause damage.
- Use a Tile-Safe Floor Polish: If your tiles still look lackluster, consider applying a commercial tile polish specifically designed for your tile type. Buffing the floor afterward can further amplify the shine.
A well-maintained tile floor reflects light beautifully, giving your kitchen a polished and inviting look.
How Often Should You Clean Your Kitchen Tile Floor?
Keeping your kitchen tile floor in pristine condition requires regular maintenance. However, cleaning too frequently or not enough can lead to problems such as tile discoloration, grout staining, or even surface damage.
- Daily: Sweep or use a microfiber dust mop to remove crumbs, dirt, and debris. This prevents buildup and reduces the likelihood of scratches.
- Weekly: Mop your tile floor using a gentle cleaner to remove any stuck-on grime or spills. Focus on high-traffic areas that see the most use.
- Monthly Deep Clean: Scrub grout lines and tackle tough stains using a baking soda paste or a grout cleaner. This prevents long-term discoloration and mold growth.
- Annually: If you have grout, consider resealing it once a year to maintain its resistance to moisture and stains.
Adjust your cleaning frequency based on household traffic. A busy kitchen may require more frequent deep cleaning, while a less-used space might need less maintenance.
Common Mistakes That Can Damage Kitchen Tile Floors
Even with the best intentions, improper cleaning techniques can do more harm than good. To extend the lifespan of your tile floor, avoid these common mistakes:
- Using Abrasive Scrubbers: Scouring pads and stiff-bristle brushes can scratch tile surfaces, making them more prone to dirt accumulation. Stick to soft-bristle brushes or microfiber mops instead.
- Applying Too Much Water: Excessive moisture, especially on grout, can lead to mold growth and weaken the tile adhesive. Always wring out mops thoroughly and dry floors after cleaning.
- Using Harsh Chemicals: Bleach, ammonia, and acidic cleaners can erode tile finishes and grout over time. Opt for mild, pH-balanced cleaning solutions whenever possible.
- Skipping Regular Grout Maintenance: Dirty grout can make an otherwise clean floor look dingy. Make it a habit to clean grout lines regularly and apply a sealant to protect against stains.
- Neglecting Spills: Allowing spills to sit too long can result in stains, especially on unsealed tile or porous grout. Wipe up messes immediately to prevent long-term damage.
By avoiding these mistakes, you’ll not only keep your tile floors looking beautiful but also ensure their durability for years to come.
Final Thoughts
A well-maintained kitchen tile floor enhances the overall appeal of your home, providing a clean and inviting space for cooking and gathering. By following proper cleaning techniques, using the right products, and avoiding common pitfalls, you can keep your tiles in top shape for years. Regular sweeping, strategic mopping, and occasional deep cleaning will keep grime, grease, and mold at bay. Small, consistent efforts make all the difference, preventing costly repairs or replacements down the line. Whether you’re dealing with everyday spills or looking to restore shine to tired tiles, these methods will help you achieve a kitchen floor that’s not only spotless but also resilient.